Course description
NOTE: This course is a number of years old and was recorded with Lightroom 5...
Join me as I show you how to process and enhance RAW landscape photographs in Lightroom using the Develop Module.
This version of the course allows you to both stream and download the course videos.
Much better than a webinar, this course includes 9 of my RAW landscape photos that you will be able to download yourself to work on and practice as you watch the pre-recorded videos at your own pace.
You will feel like I am there with you as I go into detail explaining the corrections and adjustments I make to the photos. You will benefit from working on the exact same files as I am, accelerating your learning pace.
Five Lightroom presets that I created are also downloadable and I show you how to install and use them.
Questions during the course? Use the Discussions tab to ask and answer questions in the online course interface.
This course can play on your computer (needed for file download). You can also sign in on your iPad, iPhone, or other tablet or smartphone using the web browser.
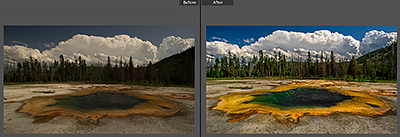
Here is a list of features from each of the main photo tutorials, showing you a before and after of each photo we will work on:
-
Zion Reflection: We start out with an easy photo that needs some basic corrections. Histogram and clipping are discussed, tonal & color corrections in the Basic panel explained, the difference between vibrance and saturation is discussed, an intro to the Tone Curve is mentioned, sharpening is discussed as is the Lens Correction panel, vignetting in Effects, and Spot removal of footprints and dust spots.
-
Sedona: In this example we will brighten up a dark image photographed on a clear day. We will bring up shadow detail from the Basics panel as well as in the Tone Curve. Here is our first lesson on Adjustment Brushes as we use them to selectively brighten up a portion of the photo, then darken another part. Brush sizes and feathering explained, as well as the eraser. First lesson adjusting saturation & luminance of specific colors using HSL and adjusting hue in Color. Noise Reduction is also mentioned. The Visualizer is explained for removing dust spots, and the Graduated Filter is explained and used to darken the sky.
-
Yellowstone: In this underexposed photo we need to be careful not to lose the highlights in the clouds. White balance is first discussed. Adjustment brush is used to knock down highlights. Upright tool in Lens Corrections is first discussed, as is cropping and angle. Chromatic Aberrations are shown and removed. More selective burning-in with the Adjustment Brush, and flow is explained.

-
Saguaros at Sunset: Here we have an underexposed photo that needs a perspective correction. White balance for sunrise and sunset is discussed. Upright tool is shown in more detail. Using Camera Calibration we remove a slight magenta cast in the shadows. The Adjustment Brush is used to make a selection, then color is corrected using White Balance and Tint.
-
Santa Fe Aspens: Here we have our darkest photo yet with major perspective issues. Shadows adjustments are made in Basic and Tonal Curves, and the Adjustment Brush is needed to fix selected dark areas of the photo. Different flow rates are used and explained to further adjust the mask.
-
Mt. Moran: An extremely flat and boring photo that needs to come to life. Graduated Filter is used to darken sky, Adjustment Brush used to enhance the mountain, and numerous contrast and color controls breath life into this photo. The challenge with this photo is that the Auto Mask doesn't work well here so we have to do our mask manually.
-
Saguaros in Sunlight: In this overexposed photo we make an attempt at trying to recover some blown out highlights. Tonal and color techniques from earlier tutorials are used here to build upon and strengthen your learning.
-
Zion Sunrise: Here we enhance a sunrise photo that was photographed dark to protect the sunlit peaks. Numerous Adjustment Brushes are needed to take care of all of the issues in this photo. Tonal and color techniques from earlier tutorials are used here to build upon and strengthen your learning.
. - Crested Butte: In this final photo tutorial we use all of the techniques learned earlier and apply them to our most challenging photo yet to enhance. Numerous Adjustment Brushes are used to control highlights and bring out shadows and two Graduated Filters are used to control tone and clarity.
Course curriculum
-
01
Intro
Show details- Welcome message and course information FREE PREVIEW
- Add course photos to a new catalog
- Note about the included photos FREE PREVIEW
-
02
Tutorials using the 9 RAW files in the Develop Module
Show details- FREE Trial Demo. (If already purchased you can skip this video) (3:20) FREE PREVIEW
- Zion Reflection (20:13)
- Sedona (25:59)
- Yellowstone (23:13)
- Saguaros at Sunset (24:23)
- Santa Fe Aspens (15:36)
- Mt. Moran (23:02)
- Saguaros in Sunlight (18:12)
- Zion Sunrise (20:33)
- Crested Butte (26:10)
-
03
Conclusion
Show details- Download and add my presets to Lightroom, how to use them
- Conclusion
- 5 question quick survey - let me know how this course was
- Become an Affiliate and earn money. FREE PREVIEW
Enroll Today!
And receive instant access to the course.
-
Get started now
$15.00
